Wednesday, June 14, 2017

Small Bunny Pattern

Small Bunny Pattern
    Operation Christmas Shoebox Project

I have really enjoyed in the past several years putting together Christmas Shoeboxes with my children.  It is a great project, sponsored by Samaritan's Purse/Franklin Graham. For more information about the project CLICK HERE!  It is a great feeling to know that you have brightened a children life, just by putting a few inexpensive (to me) items in a shoebox.  These boxes go all over the world to children that live in very poor conditions.  I give God the glory for allowing me and my family to participate in this project - it is a BLESSING to me.  

A couple of years ago, my husband allowed me to pick out and purchase the ideal sewing machine that I would need for my projects.  I'm not a great seamstress by no means, but I do enjoy trying to create little "Love Gifts".  Last year, I found the time to get the machine out and try to remember "how to sew" from my teenage years of my mom trying to teach me and Home Ec.  Haha!  

Having the Operation Shoebox project on my mind, I went pinning.  If you don't know what that means, it's looking for patterns and ideas off of Pinterest.  It's a great site, if you have never heard of it.  First, I came across a sweet little girl/boy pattern.  I did a trial run.  Lots of ripping and starting over, but finally got the feel of making these small dolls.  For the face, some ladies would sew button eyes and stitch the nose and mouth.  I chose to paint my faces.  Timing myself, I can make a doll in approximately 4-5 hours.  Yes, I know.  I did tell you that I'm not that great, plus we're talking about small pieces that I'm working with.  The dolls are precious, when I do get them done.  I need something that might be a little faster, in order to get a bulk quantity done by next November for the boxes.  I go back to pinning.  I found the cutest non-3D bunny that is so precious.  The problem?  The  entire website was in another language.  Ugh!  Really?  I clicked on every hot link that was posted on the web page.  Leading me no where.  It probably would, if I could understand the language.  I think it was Spanish (just guessing).  What do you do?  I examine the picture and free hand the pattern for a small bunny to fit in a shoebox.  It's not perfect, but I think it will work for me.  I'm posting this in order to print out the pattern, when I need it.  Please feel free to use it or be inspired to do your own.  


Instructions:
*Fold fabric, right sides together.   
*Pin in place the pattern on top of fabric. 
*Cut out all the way around.  Allow about an inch around the pattern, when cutting.  
*Again, right sides together; pin the material together; sew all around, leaving a small opening at the bottom for stuffing. 
*I use a dowel pin when I have trouble getting the stuffing in the small areas.  Don't jab too hard, it will make a hole.  
*Stitch the bottom closed and dress it up with ribbon, paint, etc. 


Below is a picture that I copied from the website that is in another language.  Aren't they just precious?  I plan on painting on the eyes and nose, just like shown.  I am hoping this will cut down on my time of ripping and re-sewing.  The website name that I borrowed their pattern is called "Clubinho da Costura".  You can  CLICK HERE!


I am going to get to sewing on these bunnies.  Wish me luck!  I will post photos, if this is all worth it. Haha!

Happy Sewing!!


Mirya


Saturday, October 22, 2016

Cake Mix Cookies


An easy and excellent quick cookie recipe.  If you are working with stoneware, you will need to adjust the time baked.  The stoneware will not let the mix spread out and I baked for 12 minutes, instead of 8-10 minutes.  If you like the thin spread out cookie, I recommend original cookie sheets.  I love this recipe because you can create so much with this simple recipe. I found this recipe from www.tasteandtellblog.com

Cake Mix Cookies 

Prep Time: 8 mins
Cook Time: 12 mins
Total Time: 20 mins

Ingredients:

  • 1 cake mix (dry ingredients only) any flavor
  • 1/2 cup vegetable oil
  • 2 eggs
  • 1/2 cup mix ins (chocolate chips, nuts, berries) use your imagination
Instructions:
  1. Preheat the oven to 350F degrees.  Line a baking sheet with a silat liner or parchment paper, if you are not using stoneware. 
  2. In a bowl, mix together the cake mix, vegetable oil and eggs until combined.  Stir in the mix ins.  
  3. Scoop the dough onto the prepared baking sheet, at least 2 inches apart.  Bake just until the cookies are set in the middle, 8-12 minutes.  
  4. Cool for 2 minutes on the baking sheet then transfer to a cooling rack or a sheet of waxed paper.  
Notes: 
According to Taste and Tell Blog, "I have used different cake mix sizes from 15.25 oz. to 18.25 oz. and they all seem to work just fine.  You won't need to adapt the other ingredients.  adapted from Columbus Foodie."  


Enjoy and Happy Baking! 

Mirya

Friday, April 17, 2015

Best Meatloaf Ever!

My dad and mom need a little help every now and then when it comes to cleaning around the house and cooking. They do what they can at their age, but us girls don't mind helping out at all. Dad and I were talking about their upcoming meal that I would be taking them. I have to be careful with them because they really don't like some foods that my family is use to making during the week. For instance, we love Italian, Mexican meals with lots of tomato and wide variety of flavors. Dad had some frozen ground beef, so I mentioned a meatloaf. My dad's lite up saying that he had not had a meatloaf in a very long time. Alrighty then! Here we go! The only meatloaf I've ever made, which was many many moons ago, was from a box that Doug brought home one day.

I go to my faithful Pinterest and the title to this recipe caught my eye.  It said "Best Ever Meatloaf."  It sounds so simple and delicious, but different from what I've ever had.  I was so moist and delicious!

Meatloaf

  • 2 pounds ground beef
  • 1 cup crushed Ritz crackers
  • 1 egg, beaten
  • 1 cup milk
  • 1/2 cup ketchup
  • 1/3 cup onion, finely chopped
  • 1 teaspoon salt
  • 1/2 teaspoon black pepper
  • 1/2 teaspoon garlic powder
  • 3/4 cup ketchup
  • 1/4 cup brown sugar
  • 1/4 cup apricot preserves
  • 1 tablespoon Worcestershire sauce
  1. Preheat oven to 350 degrees F. Coat a 5x9 loaf pan with cooking spray and set aside. In a large bowl, combine the ground beef, crackers, egg, milk, ½ cup ketchup, onion, salt, pepper and garlic powder. Mix together with your hands until thoroughly combined.
  2. Pour the mixture into the prepared pan and spread evenly. Place the pan on a rimmed baking sheet and bake in the preheated oven for 1 ½ hours. 
  3. In a small bowl, combine ¾ cup ketchup, brown sugar, apricot preserves and Worcestershire sauce. Mix well. Spread half of the mixture evenly over the meatloaf halfway through baking. Reserve the remainder of the sauce for dipping/topping. Let meatloaf sit for 15 minutes before slicing and serving.
I put the last remaining sauce on top of the loaf the last 30 minutes of baking.  Because I used the ground beef that was my dad and mom's, it did make greasy.  I would recommend ground chuck, lean beef or ground turkey.

I prepare this the night before, it was so simple and easy to prepare.

Happy Baking!! 

  Mirya

Tortilla Bowls with Mango Chicken Salad

We wanted to try something different, getting tired of the same old, same old. What do I do? Look through my bookmarked recipes in Pinterest.

I LOVE Chicken Salad and I'm so glad that I bookmarked this recipe because it was

 AWESOME!

There is a party in your mouth when you incorporate all of these wonderful flavors. So let's get to it.


Mango Chicken Salad

4 cups cubed or shredded cooked chicken (I used chicken tenderloin because it is easier to prepare and cook)
1 peeled and diced mango
1 peeled and diced avocado (how to make sure your avocado is ready - the avocado should be firm to the touch, not soft or mushy the color should be a dark green. )
1 tablespoon lime juice
1/2 red bell pepper (you can use more, if you love bell pepper.  I can't eat too much or I will regret it)
1/4 cup of chopped fresh cilantro (if you are not big on cilantro, like me, you can use less.  You want just enough for a nice mild flavor)
1 cup shredded lettuce
1/2 teaspoon salt

Combine all the ingredients above in a big serving bowl.  Make sure your chicken is cooled.  The recipe called for 1/2 cup of red onion, but I'm not a big red onion fan, so you can add or omit.  You can't mess up a chicken salad.

The recipe recommends a homemade vinaigrette, but I chose using the following:
1/3 cup Lite Ranch Dressing
Sprinkle Ground Cumin seasoning

Add the dressing to the salad and toss gently until coated.  You may want to add a little more ranch dressing, if you have more chicken then suggested.  It's up to you, but you don't want it to over take the taste of the other flavors.  If you want to try the vinaigrette, well here's the recipe.

Vinaigrette 
1 Tablespoon wine vinegar
1 Tablespoon fresh lime juice
1 Tablespoon fresh orange juice
1 Tablespoon honey
1/3 cup Canola oil

Mix together and toss gently in the salad.

Now, you need bowls to put your salad in.  This was so much fun to make and delicious!

Bowls
4 flour tortillas (I used the small 8"-10" rounds)
1/2 teaspoon ground cumin
sprinkle salt (the recipe called for 1/2 teaspoon, but it seemed like it was too much per tortilla.  I would suggest a generous sprinkle of salt instead.)
Olive oil for brushing

Heat the oven to 400 F degrees.  Brush oil on tortillas.
Sprinkle cumin and salt evenly over oiled sides of tortillas.  Press tortillas, seasoned side up, in muffin tins (making into bowls) and place in oven for 5-7 minutes or until semi crispy.

You are ready to have a fiesta.  I honestly don't believe you'll have any salad left over, once you find out how delicious it is.  For some reason, you do have some left over for tomorrow, just note that your avocado will turn a little dark.  It will still be okay to eat, it just won't look very appetizing.  If you need step by step tutorial CLICK HERE!

Your mouth thanks you!


  Mirya

Thursday, January 1, 2015

Happy New Year 2015!

Hope you all had a wonderful 2014 and looking forward to a FaBuLoUs 2015!

Doug and I want to do a little weight maintenance. I found a 30 day Plank Challenge schedule. We started it today. I've got a couple of girlfriends that are interested in doing it with us. We are still going to the gym. Honestly, gyms do me no good because I'm starving as soon as I leave the weight room. Ugh! I did stock up on Craving Blocker milkshakes. Treadmill, you will not defeat me this year! HAHA!

We had a wonderful and memorable Christmas break. Of course, we have a our family traditions that we do every year. For instance, kids sleeping under the Christmas tree; driving around looking for Christmas lights; making a gingerbread house; making Christmas cookies; making Christmas ornaments; and having family night, watching Christmas movies.

I have to say that this year was probably one of the most stress-free Christmases I've ever had. I'm blaming the common cold that I've had the blessing of catching back in the month of September and still have it to this day. There are days when I think I'm feeling better and then the next day, BAM. I'm visiting my beloved doctor again. Yay! I haven't had the getty up and go this Christmas. I didn't cook that much and Katie didn't get her cinnamon scented cut-out Christmas ornaments to put on the tree this year either. Maybe next time. I did string popcorn and cranberries as garland this year. Pretty, but I miss the construction paper chain. We'll have to go back to it this year. Basically, if something didn't get made or done. Oh well. I think I will have to continue this concept from here on out. It is so much easier just to say "I didn't do that this year." Solved.

The children and I found some fun new ways to enjoy the break. This year, I thought it would be fun for the kids to put on their PJs, I packed some fresh baked chocolate chip cookies along with a drink. As we drove around looking at Christmas lights, we listened to Christmas music, ate cookies and drank our favorite drink. When we got home, we got hot chocolate to drink before bedtime. On Christmas morning, in order to open up your present, you had to answer my Christmas trivia questions correctly. The kids really liked it. I was surprised how much they liked it, so I think we'll mark it down to use again in Christmas future. It was fun! Last year, I bought the kids some small gifts and hid them in the Christmas tree. Katie really liked that game on Christmas morning. I read on someone's blog where they have a flash light gift party. If we had a Christmas Eve party, I think the flash light gift would be fun to play.

I did find time to make a few special gifts for some family, friends and the kids' teacher gifts. It's nothing spectacular, but fun.

 photo DSC_5363_zps3c99154f.jpg

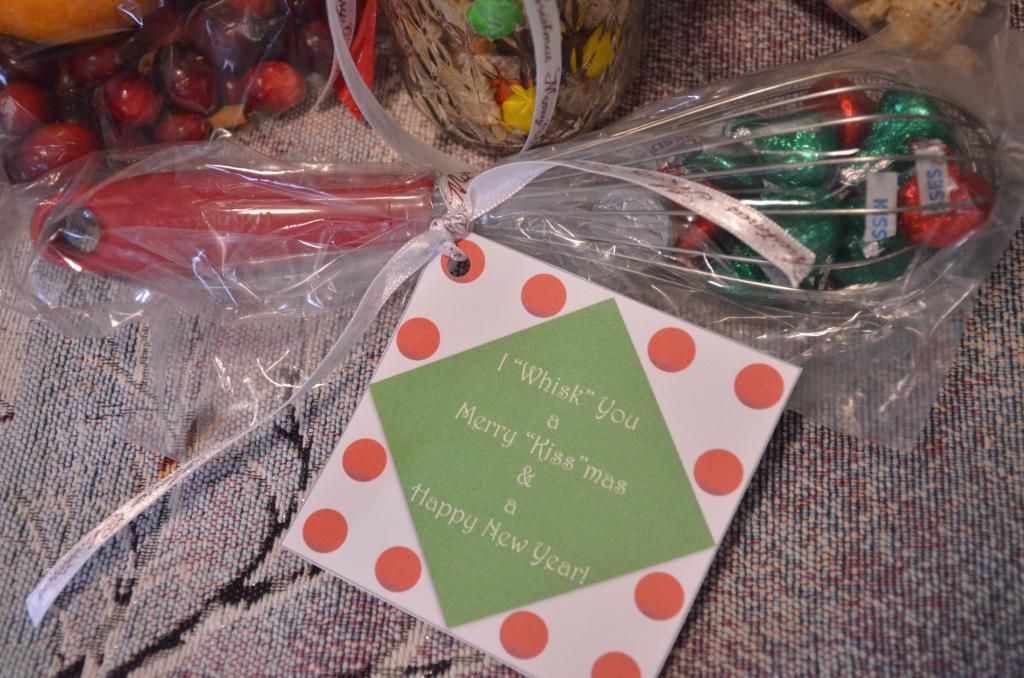
These were made for my kids' teachers - "I 'Whisk' You a Merry 'Kiss'mas & a Happy New Year!"
I found this on Pinterest one year and thought it was cute.  I just purchased whisks and filled it with Hershey's Kisses, put it in a clear bag and tied it off with ribbon.  Our teachers seemed to like them. 

 photo DSC_5364_zps99f3e5d1.jpg

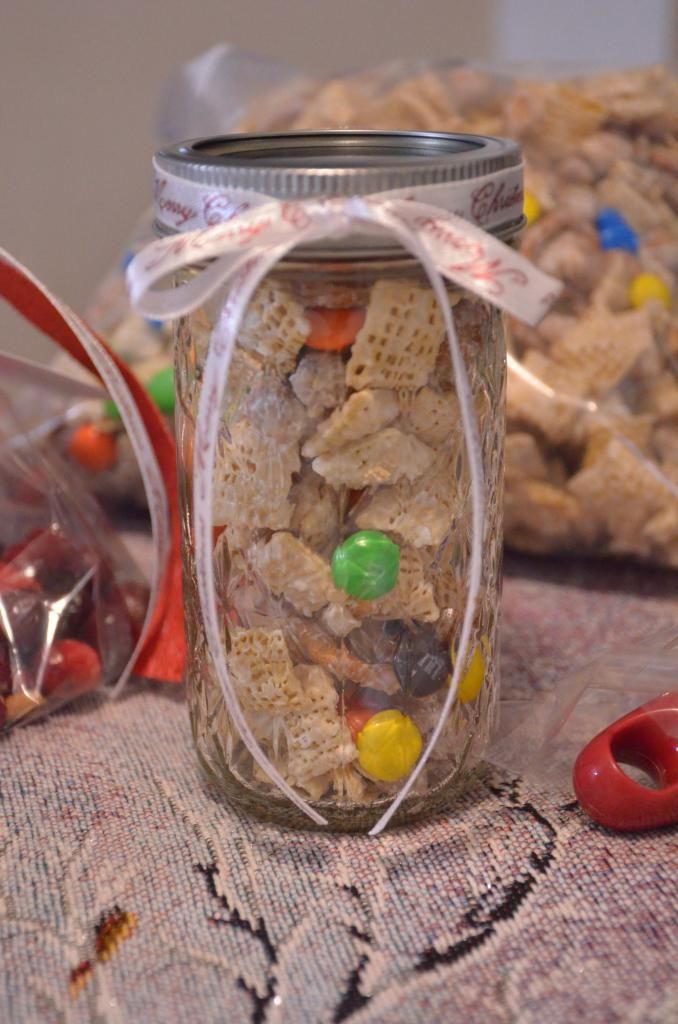
I purchased some pretty canning jars and filled them full of my Christmas Chex Mix.  Below, is my recipe: 
Christmas Chex Mix
Ingredients: 
3 C Rice Chex Cereal
3 C Corn Chex Cereal
1 C Honey Roasted Peanuts
1 C small Pretzel Twists
12 oz. Vanilla Almond Bark 
12 oz. M & Ms (your favorite flavor)

Instructions: 
In a large bowl, combine chex cereal, pretzels and peanuts. 

Melt the chocolate in the microwave (90 seconds on high and intervals of 15 seconds each additional time until melted). 

Add the chocolate to the chex mix and gently stir to coat. 

Spread the mix out onto parchment paper into a single layer.  Add M & Ms on top.  

After an hour of cool, break up the mix into pieces.  Store in an air tight container. 
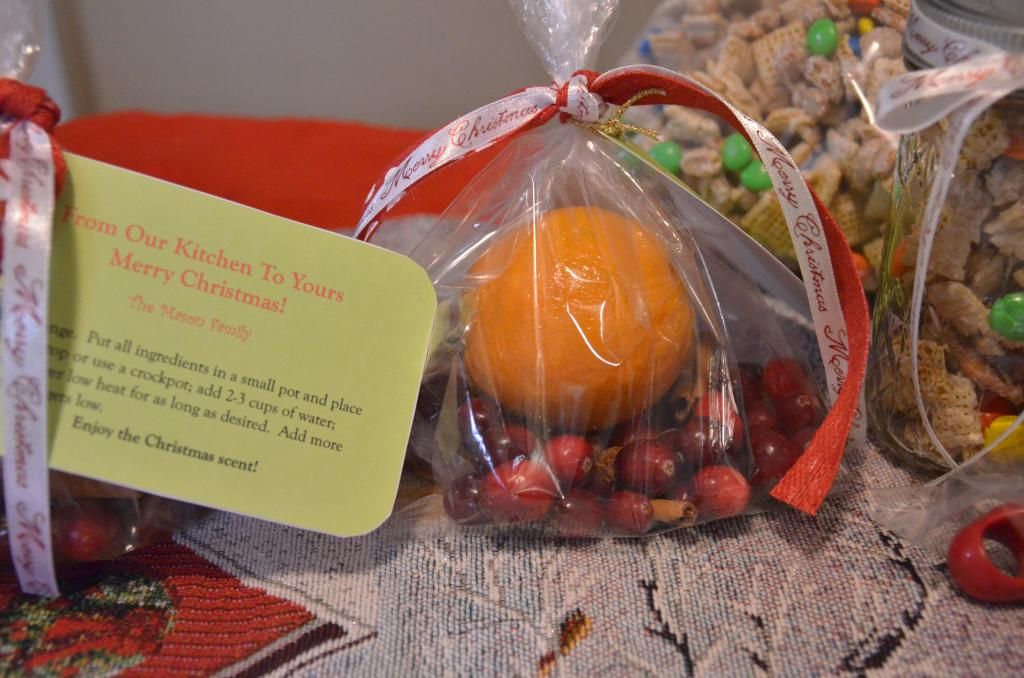

Christmas Potpourri
I've been wanting to make this stove top potpourri for a couple of years, but would forget about it until it was too late.  This year, I made sure to make a few bags of potpourri to give away for a little "Thinking of You" type Christmas gifts.  The recipe is below: 

 photo DSC_5365_zpsbf4a26cc.jpg

Ingredients: 
1/2 C fresh cranberries
1 orange
4 cinnamon sticks (broken in half)
1 Tbsp whole cloves
1/8 tsp ground nutmeg
Make guests simmering instruction tags


Instructions: 
Place all ingredients into a clear bag and hold securely with a rubber band.  Decorate with simmering instructions and pretty ribbon.  

Below is an example of our gift tag. 


In case you can't read the tag very well.  See below:

Directions: 
Slice orange.  Put all ingredients in a small pot and place on stove top or use a crockpot; add 2-3 cups of water; simmer over low heat for as long as desired.  Add more water, if it gets low.  

For our Christmas parties, I tried to make Pinwheel sugar cookies.  What a joke!!  I made 2 batches of this cookie and ended up renaming them "Grinchy Christmas Cookies".  It didn't matter if my cookie dough was nice and chilled (hard) or soft.  Every time, I jelly rolled the two colored dough and put it in the fridge, it would want to settle flat.  Making the dough more oval than round.  Ugh!  I re-rolled the dough to make it round, which made the cookie look more whimsical than round and pinwheel shape.  Thus, the name change.  LOL!  You've got to laugh about it.  The cookies were still tasty.  My children LOVED them, no matter what they looked like.  Doug requested a batch of "Reeses Peanut Butter No Bake Bars".  Do you remember getting these as school, before the "healthy food" aka "no taste food"?  The layer of solid chocolate on top of peanut butter mixture bar.  Oh, they were so good.  Well, I think I brought some people back to their school years, when I opened the lid to my peanut butter bars.  Below is the recipe: 

Reese's Peanut Butter No-Bake Bars
Ingredients: 
1 C salted butter (melted)
2 C Keebler Graham Cracker Crumbs
1/4 C Brown Sugar
1 3/4 C Powdered Sugar
1 C Peanut Butter
1/2 tsp. Vanilla Extract
1 (11 oz.) bag milk chocolate chips 

Instructions: 
Combine all ingredients, except chocolate chips in a medium bowl.  With help from your trusty mixer, mix until the mixture is smooth and creamy.  

Pour peanut butter mixture into a 9x13" casserole dish.  

Melt chocolate chips in the microwave (at 50% power) for 1-2 minutes.  Stir chocolate and pour over the peanut butter mixture.  Spread chocolate with a spatula.  To even out chocolate, tap dish on the counter.  

Refrigerate bars for an hour.  Cut while bars are still cool.  Enjoy! 

I'll keep these recipes listed under my recipe link for future reference.  

What will the year 2015 hold for us?  I know, we are awaiting another family wedding this year.  My youngest nephew got engaged to a wonderful, patient and beautiful young lady.  They decided to wed in the month of September this year.  I am so happy for them and wish them all the best on this blessed adventure together.  I hope your 2015 will be a blessing for you and others around you.  God loves you and so do I! 
  Mirya

Sunday, October 5, 2014

Bright Star's Tartar Sauce

Doug insisted that I post the famous Bright Star's Tartar Sauce Recipe for you and our future reference.

Bright Star's Tartar Sauce
(Yields 1 quart)

Ingredients:
1 qt. commercial-style salad dressing (Miracle Whip)
2 (10 oz.) jars pickle relish
1/2 bell pepper, finely chopped
1/2 onion, finely chopped
1/3 carrot, finely chopped
1/2 teaspoon minced garlic
Juice of 1 lemon

Directions:
Mix all ingredients until well blended.  Refrigerate until served.

Enjoy!


  Mirya

Friday, August 29, 2014

Crockpot Salsa Chicken Recipe

I had this recipe pinned on Pinterest in hopes that I would try.  Today was the perfect day to have this meal.  It's been one of those crazy weeks, with the kids' activities and school and trying to keep the house clean.  I needed some help with supper.  I don't know about you, but I LOVE crockpot or one skillet suppers.  They are the best for any mom!

Crockpot Salsa Chicken 

Ingredients: 
4 frozen boneless skinless chicken breasts
1 (16 oz.) jar of your favorite salsa
1 packet of taco seasoning

Combine all the ingredients in the crockpot on low for 6 hours.  Around the last hour or two, I shredded the meat with a fork.  The chicken is so tender, it just falls apart.  Yum!!

I placed fiesta shredded cheese, jalapeños, taco sauce, black sliced olives and 8" flour tortillas out on the table for my family to assemble their own burritos.  I also warmed up some black beans to go along with our  meal.  It was so good!  You can't go wrong with this dish.


Fall is right around the corner and I have to got the bug.  I can really feel it with football season starting and the trees changing colors here already.  We haven't had much rain in the past few days, so most of the leaves are turning brown and collecting on the ground.  I hate it because I love our autumns.  So many many colors, just like a painting.

In the next week or so, I plan to do my fall cleaning.  I put away all my everyday decorations and bring out the autumn decor.  The kids love it!  Some people like to change their furniture around, get new or refurbish the old.  I just like to change out the knick-knacks and other pretties.  It really does make a huge difference in the room; however, sometimes I think I go a little over board on the fall and Christmas decorations for our size home.  HAHA!  I use to joke about it and say that Santa just threw up all over the house.  LOL!

You might begin seeing more new recipes on here in the next few weeks because with fall season comes new comfort food recipes.  Plus, I'm wanting to try some new cookie recipes to prepare for Christmas.  Yes, I said the big word - CHRISTMAS!  Believe it or not, it will be here before you know it.  I can not wait to start making the homemade soups, chili's, pot pies, and dips galore for our chips as we watch Bama roll over their competitors.

I would like to wish you an awesome Labor Day!

  Mirya

Wednesday, August 13, 2014

First Day of School

 photo DSC_4344_zps717f071f.jpg

First day of school was awesome according to Katie.  I know it wasn't awesome earlier this morning.  Let me just tell you before we went to bed last night, Katie came out of her room sobbing.  She was scared and worried about school.  Ugh!  There is absolutely no doubt that she is my child.  I would literally be sick at my stomach the first day of school.  Katie is just like me.  When I tucked her back in her bed, I thought I had answered all of her questions last night.  We said our prayers, asked God to give her strength and peace.  She seemed calmed before I closed her bedroom door.  The next morning was a different story.  First of all, I had a hard time getting her head out of bed.  Second, she walked into the bathroom with red, swollen eyes.  She told me that she stayed up crying all night.  Oh. Me!  I told her for the hundredth time that she will feel so silly once she gets to school and realize that it will be just fine.  For some reason, she didn't feel very comforted.  It wasn't long after my lecture, she began crying again.  I guess there are just times when a girl needs to cry.  She told me, she will miss me so much.  What's so bad is I really wanted to cry because my babies are getting older and my baby boy was starting Kindergarten, but I couldn't because I had to be strong for Katie.  I knew that if started crying, she wouldn't stop and it would just make things worse.  She was so upset that she couldn't eat breakfast.  No matter how hard I tried, she wouldn't eat a bite.  I wished I had thought about packing some soda crackers for the road, for her to munch on.  She was a wreck, sick at her stomach.  Poor baby cried all the way to the school door.  When I picked her up later in the day, she was all smiles.  She was a completely different child.

Colton on the other hand, got out of bed, ate his breakfast, finished getting ready for school and was ready to go out the front door.  He spent the rest of his time trying to calm his big sister.  He told her, "it'll be alright Katie".  He is also good at keeping me informed as to every time Katie began crying again.  He is a good little brother.  

The kids had a great day at school.  As soon as I picked Colton up, he wouldn't stop talking until we got home.  LOL!  He loves his teacher, play ground and meeting new friends.  I had him eat lunch at the cafeteria today.  He has never done this before, so it was a new experience for him.  He said that he ate just about everything.  I was pleasantly surprised because I didn't know how he would like the food.  Now, I can relax from needing to make lunches every day.  Yay!  Katie was so happy because she knew everyone in her class.  She loves her teachers.  The only thing she didn't care for was snack.  She said it was so boring because they had to sit for 15 minutes on the sidewalk and eat their snack before they went to gym.  I can imagine the girl reunion party at P.E.  Katie was thrilled to found out what classes her other girlfriends ended up going.  They had a lot of catching up to do, I can imagine.

Why is it that teachers know just what to give to moms and dads on the first day of school causing  the flood waters to break loose.  I received a precious poem from Colton's teacher, thanking me for having enough faith and trust to hand over my child into her care.  Oh my goodness, talk about getting choked up.  I had a hard time to read it for tearing up.  I had to straighten up because I was way back in the school traffic line and I didn't know what shape Katie was in.  LOL!  I was thinking, "get a grip mom".

I started on one of many projects today.  I have this bookshelf in our house that is packed full of recipe books, photo albums, church material, genealogy, and simple books like address and phone books.  Trust me, it's packed.  I've been wanting to pull it all out and organize a little and put away some loose photos, newspaper clippings, etc.  Shew!  I filled up the photo album that I purchased and need to get another one.  HA!  I've got lots of projects in line for this Fall and Winter.  My sister told me the other day that she thinks I like staying busy.  LOL!  

I hope everyone else had a wonderful first day of school.  

Mirya